This recipe builds upon the previous recipe that showed how to route documents between document libraries in a site.
Using Content Organizer, it is possible to route
documents to different sites. There are many uses for this type of
functionality. For instance, proposals can be uploaded to a common site
but routed to an appropriate site based on its metadata properties.
This gives an out of the box power to SharePoint,
which is beneficial to users. It also helps manage the size of document
libraries through intelligent routing. No longer does an organization
need to keep all documents in one place and then implement an archiving
solution when the library grows too large.
This recipe shows how to implement the aforementioned functionality.
Getting ready
You must have farm-level administrative permissions to the Central Administration site.
You must have two sites set up and you should be the owner of these sites.
How to do it...
Open up the SharePoint website from the last recipe. It contains the Drop Off Library.
Click Site Actions, then Site Settings.
Click Content Organizer Settings under the Site Administration section.
In the section labeled Sending to Another Site, check the box shown in the next screenshot:

Open the second SharePoint website B that was created as part of the requirements.
Click Site Actions, then Site Settings.
Under the Site Actions section, click Manage site features.
The first feature listed is the Content Organizer. Click on the Activate button to the right of the feature.
Click Site Actions, then Site Settings.
Click Content Organizer Settings under the Site Administration section.
In the section labelled Submission Points, copy the web service URL shown.
Open the Central Administration screen and click General Application Settings.
The first section is External Service Connections. Under it, click Configure send to connections.
In the section labeled Connection Settings, set the following parameters in the display as follows:
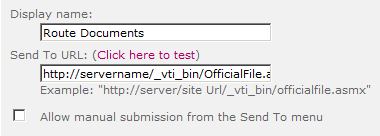
Copy the URL from step 12 into the Send to URL text box.
Ensure that the Allow manual submission... checkbox is not checked.
Enter Display name as Route Documents.
Navigate back to SharePoint website A.
Click Site Actions, then Site Settings.
Click Content Organizer Rules.
Hover over the item named CashFlow and click Edit Item.
The following screen pops up:

Choose the Another content organizer in a different site option and select Route Documents from the drop-down.
Click OK.
Follow steps from 9 to 12 from the first recipe.
Navigate to the Drop Off Library in SharePoint Site B. The document will be present there.
How it works...
The key to this recipe is that both sites need to have the Content Organizer feature activated; steps 1 to 9 accomplish this.
Included in those steps was designating SharePoint
Site A as having the capability to provide documents to another site. We
did this in step 4.
The next part of getting routing between sites to
work was to configure the connections between the two sites. SharePoint
Site A was the provider and SharePoint Site B was the consumer. Central
Administration acts as the glue needed to wire up the connection between
these two sites.
Steps 10 to 16 accomplished the wiring. Copying the URL from Site A, we created a connection through Central Administration.
Then we edited the Content Organizer rule from the
first recipe and changed the location in the drop-down for the
destination. The new location (Route Documents) appeared in the
drop-down as result of the changes we did in the Central Administration.
As we routed the document, SharePoint provided confirmation, including a link to the new location where the document was routed.
There's more...
When going to Central Administration to modify the
Send to Connections option, please be cognizant as to the web
application showing. The list is maintained on a web application basis.
Documents can be routed to different web applications.